Steps
Method 1
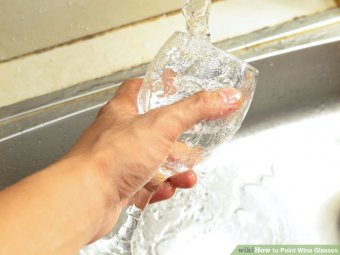
Readying the Glass- Wash the glass well in warm, soapy water. Whether you're using a new glass or one of your old favorites, it can accrue a layer of dust or dirt just sitting in storage. Make sure it's sparkly clean - run it under soapy water and rinse it well.
- Allow it to adequately dry. You don't want to paint on glass that's streaky or wet.
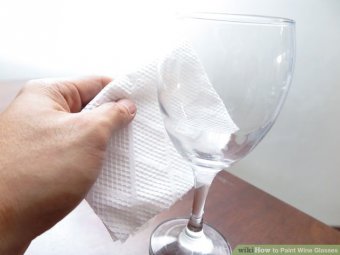
- Clean the surface of the wine or martini glass with rubbing alcohol and a paper towel. Remove any oil, dirt, soap film, or fingerprints that will mess up your paint work. Let the glass sit to dry for about 7-10 minutes after rubbing.
- If you don't have rubbing alcohol, use white vinegar; it has similar cleaning properties.
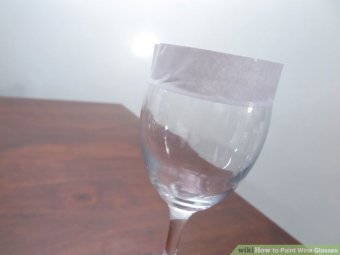
- Place masking tape on the rim of your glass. You want a solid 3/4" (2 cm) of your rim to be paint free. As some paint is toxic, it's important not to paint on any surface that could reach your mouth. What's more, the paint will be more likely to deteriorate if it meets drink or your lips.
- Make sure the tape is even. If it's not perfect, it's super easy to adjust. Use masking or painter's tape for best results.
 Method 2
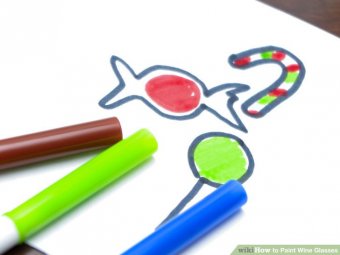
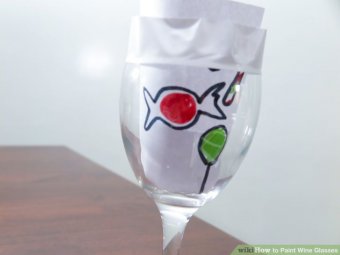
- If you draw the pattern on a piece of paper or tissue paper, this will allow you to insert it inside the glass, secure it, and use the pattern to transfer and paint over the design. Tissue paper will be easier to work with as it bends much more easily.
- You by no means need to create a design that requires a sketch. Geometrical and abstract patterns are just as beautiful, if not more so. If it'd be helpful, use tape to devise a pattern on the outside of your glass; you can then easily paint around it. Same goes for the stem and base!
- Secure your stencil to the glass. There are so many products out there, it's tough to know where to get started. The simplest way is to sketch your design and secure it with tape on the inside of your glass. You have a couple more options, however:
- Place your sketch inside your glass and fill it with something like a sock or quilt batting. The soft interior will keep it in place, intact.
- Buy self-adhering stencils at your local craft supply store. If you can fathom its existence, it can be found. Stencils come in sticker form nowadays, and you can just plop them onto your glass and paint away.
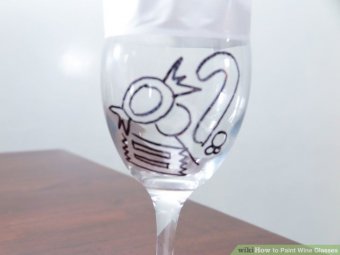
- Sketch the design onto the glass. Use a fine point sharpie (or marker that will not wipe off) to sketch a design on the glass. If you don't like your sketch, you can use a q-tip or cotton ball dipped in rubbing alcohol or nail polish remover to "erase" the marker or paint.
- This outline will probably remain visible.
 If you want to go for a more of a "One Stroke" method, skip sketching directly on the glass, and just paint using the sketch underneath.
- This outline will probably remain visible.
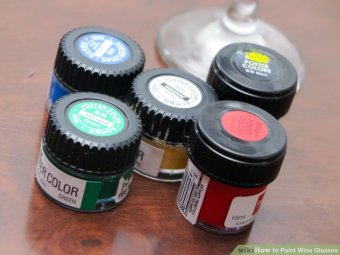
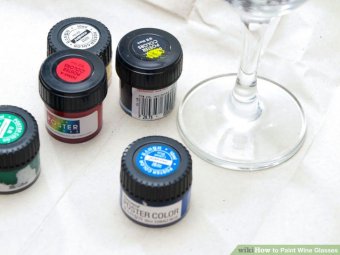
- Choose your paints. As with stencils, it's easy to walk into the paint aisle and feel absolutely overwhelmed. There are a handful of varieties to choose from and the differences are really only nuanced - they'll all create something pleasurable to the eye. What you choose is just a matter of current mood and taste.
- Enamels (like Folk Art or Martha Stewart) are water-based and especially geared toward glass painting. They can handle the dishwasher if cured (not necessarily the microwave, however) - but some require a primer and top coat (like PermEnamel), so note the label.
- Acrylics work, too. However, it generally depends on the quality of the paints you choose - some are more prone to washing off. If you do go the acrylic route, spray a high-quality varnish on top (they have sparkly ones!) to secure the paint to the glass.
- There are acrylics that are designed more for glass painting. If acrylic is your jam, use this variety.
- Regardless of what type of paint you end up using, you'll probably encounter air dry and heat dry forms. In general, the glasses that are baked (require heat drying) last longer.
- To add more spice to the mix, you'll also have the option of choosing transparent (light will pass through), opaque (light will not pass through), and frosted paints.
 Decisions, decisions.
 - They've officially thought of everything - glass paint markers are available, too. They bake on and make even the most detailed of glasses beginner-doable.
- Prep the area. Though it should go without saying, paint isn't fun to pick off your favorite sweater or your grandma's mahogany table. Go change your clothes, and lay down several layers of newspaper or wax paper - anything to protect those surfaces. And take the dog outside.
- While you're at it, open the windows. Being high on paint fumes isn't the state you want to be in for this project!
- Start coloring. Glass painting methods number no fewer than canvas painting methods. This part is entirely up to you. But if you're looking for a little inspiration, here's a few jumping off points:
- Create a marbleized glass by pouring your paint over your piece, top to bottom. Pour in a thin even layer, rotating the glass consistently. Alternate colors as desired. Liquid fill paints will be best for this method.
- Use just one color and pour on until completely covered to create a solid painted glass.
- Use tape to make stripes. Just after you've painted between the stripes, take it off; if the tape is taken off when the paint is dry, you risk chipping the paint. If you have any quirks in your stripes, just take your craft knife and carefully chip away until the lines are straight.
- Get polka-dotting. The blunt end of your paintbrush is great for dots, or you can use a dauber or spouncer. To do this effectively, never come in or go out at an angle. Always place your tool straight down and take it straight back up.
- Use sponges. Whether it's a dish sponge or a sponge brush, you can create interesting, layered designs with a dab of paint - little skill required.
- Don't forget the stem and base! Half of your "canvas" isn't the actual glass (if you're using a wine glass). For the base, consider painting the underside to achieve an is-it-there-is-it-not-there...
- Create a marbleized glass by pouring your paint over your piece, top to bottom. Pour in a thin even layer, rotating the glass consistently. Alternate colors as desired. Liquid fill paints will be best for this method.
Source: www.wikihow.com
Share this Post
latest post
-
 Camo Dinnerware Set September 29, 2023
 -
 Blue China Plates September 23, 2023
 -
 China Dinner Plates September 17, 2023
 -
 Corsica Dinnerware Set September 11, 2023
 -
 Home Dinnerware Set September 5, 2023
 -
 Owl Plates and bowls August 30, 2023
 -
 Crate and Barrel White Dinner Plates August 24, 2023
 -
 Modern Dinnerware Sets Clearance August 18, 2023
 -
 Melamine Dinnerware Sets Clearance August 12, 2023